Overview
Materials Commons allows you to load data from a spreadsheet. We call this process ETL, which stands for (E)xtract, (T)ransform, and (L)oad. As long as you follow a few rules, Materials Commons can read your spreadsheet and automatically create the samples, processing steps, measurements and process attributes.
Format
There are 3 required rules to follow when constructing a spreadsheet for Materials Commons to process. All other rules are optional.
- The first column contains the names of your samples
- The first row consists of headers
- Each processing step must be in a separate worksheet in your spreadsheet. The processing step will have the same name as the worksheet.
This will look as follows:
| Sample Name | Attribute 1 | Attribute 2 |
|---|---|---|
| Sample 1 | 4.0 | 5 |
| Sample 2 | 4.1 | 5.01 |
By default, Attributes are considered process attributes. To see how to specify sample attributes see "Specifying Column Types".
Units
To include units add them into your attribute header in between paranthesis. For example, Attribute 1(mm) means that all measurements for Attribute 1 are in mm.
Your spreadsheet would now look as follows:
| Sample Name | Attribute 1 (mm) | Attribute 2 (s) |
|---|---|---|
| Sample 1 | 4.0 | 5 |
| Sample 2 | 4.1 | 5.01 |
Specifying Column Types
Your first column must be sample names. After this you can control how Materials Commons will interpret each column. To do this use a keyword which is a special word that Materials Commons understands followed by a colon. Keywords are case insensitive: for example, file: is a keyword. You can type it as file:, File:, FILE:, fILe: or any of these combinations. A keyword must appear as the first word in your column header. Materials Commons will ignore any extra whitespace before the keyword.
Currently Materials Commons understands the following keywords:
| Keyword | Meaning |
|---|---|
| s, sample | Column specifies a sample attribute |
| p, process | Column specifies a process attribute (remember by default columns are process attributes, so this is optional) |
| file, files | Column specifies a file entry |
| i, ignore, note, notes | Column is ignored and not processed |
Here is an example using some of these keywords
| Sample | s:GS(mm) | p:Time(sec) | p: Temp (k) | note: | i:is valid? | file:/Dir1/Dir2 |
|---|---|---|---|---|---|---|
| S1 | 42 | 100 | 400 | some flux | yes | image.jpg |
Associating Files
In Materials Commons, you can associate files with your processes and samples. Materials Commons will then show you the files associated with the sample/process you are looking at. You can also do this within your spreadsheet. The file: keyword lets you specify a column that can contain files and directories with your samples.
There are a couple of rules to make this work:
- The files must already be uploaded into your project on Materials Commons
- You must start the path with a slash, for example /docs/docs/file1.txt
- You may specify a directory, in which case all files in that directory will be associated with the sample
- You may use wild cards, for example /docs/docs/*.png
- You can specify multiple entries in a cell by separating them with a semi-colon, for example /docs/docs/*.png;/docs/docs/file1.txt
Using the file: keyword
The file: keyword has two forms:
file:directory pathfile:description:directory path
Here are examples for each of these:
file:/D1
file:Sample Measurements:/D1
The file: keyword is used to specify the directory in a column where files are located. An example spreadsheet would look as follows:
| Sample | file:/D1 | file:Sample Images:/Images |
|---|---|---|
| S1 | measurements.xlsx | F1.jpeg |
| S2 | F2.jpeg | |
| S3 | /Others/F3.jpeg | |
| S4 | /Images/SEM/*.png |
There are a couple of things going on in this example. First, you can see an example using each of the forms of the file: keyword. Second, you can have blank cells, as F2 and F2 have for the "file:/D1" column. Lastly the F3 file entry looks different because the cell for the file contains a full path.
The sample S3 entry demonstrates one other feature of the file: column. If you have a cell that contains a "/" in it, then it is assumed it contains a full path name, and the path name specified in the file: keyword will be ignored. This is really handy for a couple of reasons. It allows you to just put in your file names in your cells (such as S1.jpeg) without having to specify the whole path. Finally, it allows you to override this path where you have a special case. Alternatively, for S3 you could have created a 3rd file: column. This is also a good approach, but if you only have a single or small number of special case paths, creating an extra column may only serve to make your spreadsheet wider without adding much value.
Multiple files for a sample
To specify multiple files, you can either create multiple file cells, or separate the entries in a single cell with a semi-colon.
Ignoring Columns
You can tell Materials Commons to ignore a column by using one of the following keywords: i:, ignore:, note:, notes:. These keywords are special in that if they are in the only word in a column you can drop the ":". For example:
| Sample | i:Valid? | notes: |
|---|---|---|
| S1 | No | Wrong settings on SEM |
| S2 | Yes | Best run yet! |
In the above spreadsheet, Materials Commons will ignore the i:Valid? and notes columns. The values in these columns will not be processed.
Blank Cells
Materials Commons will ignore blank cells when processing your spreadsheet, however, sometimes you want to explicitly mark a cell in a special way. If the cell is blank, it could mean you still have to get that measurement, or it could mean that it is not appropriate to have a value in that cell. Materials Commons will ignore cells that contain the word "blank" or "n/a". For example:
| Sample | S:grain size(mm) | P:Temperature(k) |
|---|---|---|
| S1 | N/A | 400 |
| S2 | 3 | n/a |
In the spreadsheet above, Materials Commons will ignore grain size for S1 and Temperature for S2. Remember that Materials Commons recognizes special and keywords regardless of their case.
Building A Workflow
In this section, you will learn how to construct a workflow using your spreadsheet. This allows you to specify the processing steps a Sample goes through. Materials Commons will then construct a graphical representation of this workflow. The example below shows two tables. Each table represent a separate worksheet with the name given in bold.
Sheet: SEM
| Sample | From | S:grain size(mm) |
|---|---|---|
| S1 | Heat Treatment | 4 |
Sheet: Heat Treatment
| Sample | From | P:Time(m) | P:Temp(k) |
|---|---|---|---|
| S1 | 30 | 400 |
To construct the workflow you need to have multiple worksheets in your spreadsheet. When you have multiple worksheets you can tell Materials Commons to use the second column as specifying the preceding step.
In the example above there are two worksheets, one named "SEM" and one named "Heat Treatment". The From column specifies the processing step previous to SEM for the S1 sample. That is sample S1 went through a "Heat Treatment" process before SEM was performed. Materials Commons will construct a workflow that looks as follows:
Create Samples -> Heat Treatment -> SEM
"Create Samples" is a special process that Materials Commons creates that denotes the starting point for all samples.
When constructing a spreadsheet that specifies a workflow, column 1 and column 2 are treated specially. Otherwise only column one is treated specially.
Global Values
In some cases you may have values that are shared across all the entries in a worksheet. For example your "Heat Treatment" worksheet uses the same temperature for all rows. Rather than repeating this you can optionally create a worksheet named 'mc constants'. In this worksheet you can specify values that apply to all rows of a worksheet. The format for this worksheet is as follows:
| Sheet | Attribute | Value |
|---|
For example:
| Heat Treatment | p: Temperature (c) | 400 |
This would specify that every sample in the "Heat Treatment" worksheet has process attribute "Temperature" with units "c" and value "400".
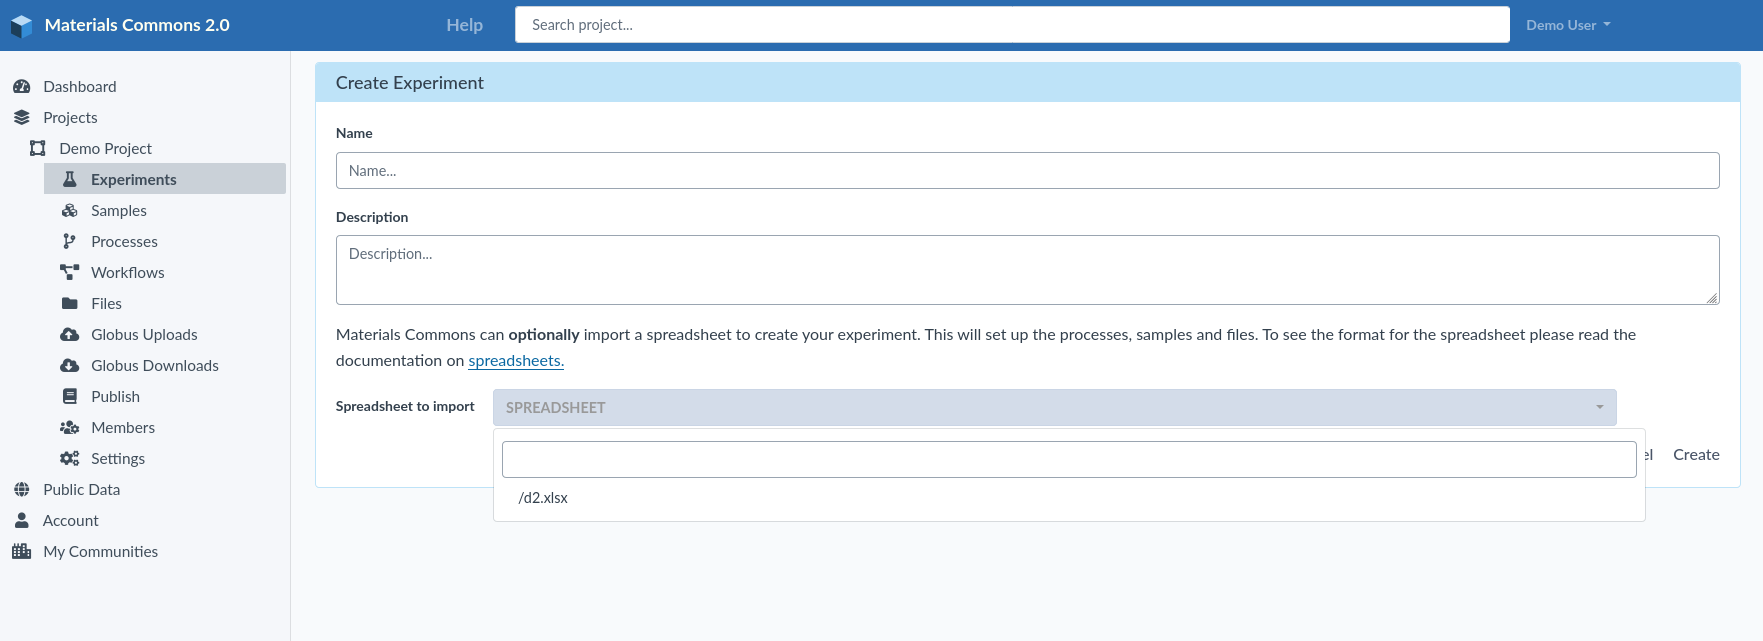
Loading a Spreadsheet into Materials Commons
To process a spreadsheet in Materials Commons you must have already uploaded the file into the project. After that you can use the spreadsheet to create a new experiment. To do this go to your project and select create experiment.
If you have a spreadsheet loaded then the create experiment page will present a dropdown of the spreadsheets. Select one to use it to populate your experiment.